In this Blog SEO guide we’ll discuss:
- How to optimize your WordPress blog for search engines?
- How to add Google Analytics Tracking code to your blog?
- How to add your site Google Search Console?
- How to submit XML sitemap to Google Search Console?
- How to optimize your blog content posts and pages?
So far you have done a damn good job. You did everything required to start a WordPress blog – perfectly.
Right from niche selection to buying domain name and hosting, and then WordPress setup and customization. Finally, you successfully added the necessary plugins.
You are on a right track to your blogging journey.
Now it’s time to talk about growth.
In order to grow your blog, you have to attract visitors to your blog.
And for that you’ll want to do a few things:
1. Create as much content as you can.
2. Promote your content stories.
3. Blog SEO: Optimize your blog for search engines.
We will discuss point 1 and point 2 later in another section.
In this section let’s learn how to optimize a WordPress blog for SEO.
How?
Blog SEO: 3 Steps to Optimize Your Blog for Search Engines
Optimizing a blog is not that hard. If you are committed enough, you can definitely achieve your goal.
First, a few technicalities:
#1. Create a custom URL structure:
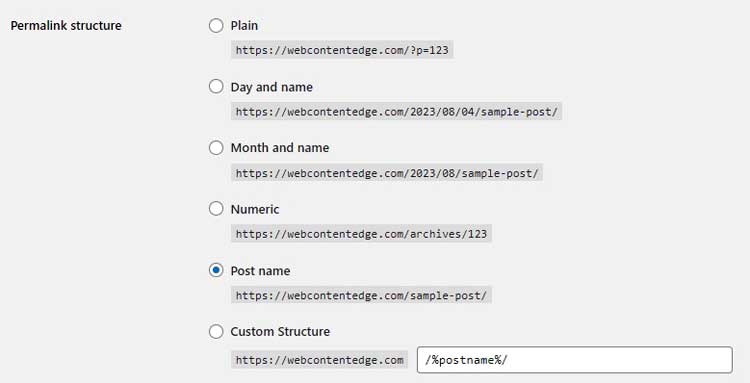
Visit your WordPress dashboard. On the left-hand side find Settings >> Permalinks. Under the “Common Settings” section Tick the “Post Name” box, and then click on the “Save Changes” button at the bottom.

#2. Installed an SEO plugin:
If you have not installed an SEO plugin such as Yoast SEO or Rank Math, please install and activate it.
#3. Install Google Analytics:
How to install Google Analytics in WordPress?

First, open Google Analytics page located here.
Sign up using your Gmail account. From there follow the steps given (Google will guide you). Once setup is complete, Google will present a tracking code for your website.
Copy this code and paste it on the header of your WordPress theme.
If your theme doesn’t provide this option, install and activate the “Insert Headers and Footers” plugin. Then, on your dashboard, visit the Settings » Insert Headers and Footers page. Then paste your code into the “Scripts in headers” section.
Want a more convenient way?
Install and activate the MonsterInsights plugin. It’s free. Follow the steps. With this plugin, you don’t need to copy/paste the Google Analytics tracking code. Just allow the plugin to access your account and you are good to go. (Learn how to install WordPress plugin here)
The best part, you can view your Google Analytics reports inside your WordPress dashboard. Simply visit the Insights » Reports page to check out a quick overview of your analytics data.
#4. Add your site to Google Search Console:
Since you have already added your blog in Google Analytics, it’ll be very easy to add and verify. For this, you need to visit Google Search Console page here and follow the steps.
When it asks you to verify your site, choose Google analytics options. Click on verify button and it’ll get auto-verified.
#5. Submit an XML sitemap:
Finally, you need to submit an XML sitemap to Google Search Console. An XML sitemap is a tiny file that lists your post and pages that you want search engines to crawl.
You can create an XML sitemap in many ways. There are also many tools available for creating XML sitemaps in WordPress. However, the easiest way to create an XML sitemap is by using an SEO plugin.
As you have already added an SEO plugin to your WordPress blog, it’s going to be a hassle-free process.
On your WordPress dashboard, hover over the SEO plugin and click on sitemap settings and follow the steps. Once you complete the process, you’ll get a link like this: https://yoursite.com/sitemap_index.xml.
Now open your Google Search Console account. Click on the “Sitemaps” tab on the left-hand side.
Paste the last part of your sitemap link (sitemap_index.xml) in the “Add New Sitemap” box. Then click on the “Submit” button. Your XML sitemap is added to Google Search Console.
Finally,
Blog SEO: Content Optimization
Optimize your blog content for search engines.
Content optimization includes:
#1. Keyword Research: Find one main keyword (primary keyword) for each page/post. Also, get a few relevant long-tail keywords (secondary keywords) (3+ word phrases).
#2. Place ‘primary’ as well as ‘secondary’ keywords throughout your content strategically. Just keep in mind that don’t overdo this – ‘keyword stuffing’ may harm your SEO efforts.
#3. You also want to put your main keyword in the beginning and conclusion (end) of the page/post.
#4. Also, insert your primary keyword in header/heading tags (H1 to H6), title tags, and Meta description.
#5. Images optimization: Likewise, you want to optimize your images – don’t forget to use keywords in image names and alt tags.
#6. Internal linking: Internal linking is one of the easiest things you can do to enhance your SEO. It also improves user engagement and reduces bounce rates. Therefore, make sure you link your pages/posts to other pages/posts whenever relevant.
Apart from these, there are some other factors that you want to consider such as page speed and responsive design.
Make sure your site opens quickly (page speed is one of the most important Google ranking factors).
Similarly, make sure your site is mobile responsive. If you are using WordPress, it shouldn’t be a big issue. Just pick a mobile responsive theme.
These are the fundamental On-page Blog SEO steps that you should take to optimize your blog for search engines.
In another section, we’ll discuss more advanced SEO strategies including Off-page SEO and link building.
JD Bhatala is a Content Marketing Strategist with over 15 years of experience. He is the co-founder of Web Content Edge where he helps online businesses gain visibility and increase traffic, leads, and sales. Catch him online at Twitter or LinkedIn.

